


Mic a Snare Drum article
Mic A Snare Drum for Beginners: A Complete Guide
Nervous about miking your snare drum? This beginner guide reveals straightforward positioning and proven techniques for immediate professional results.
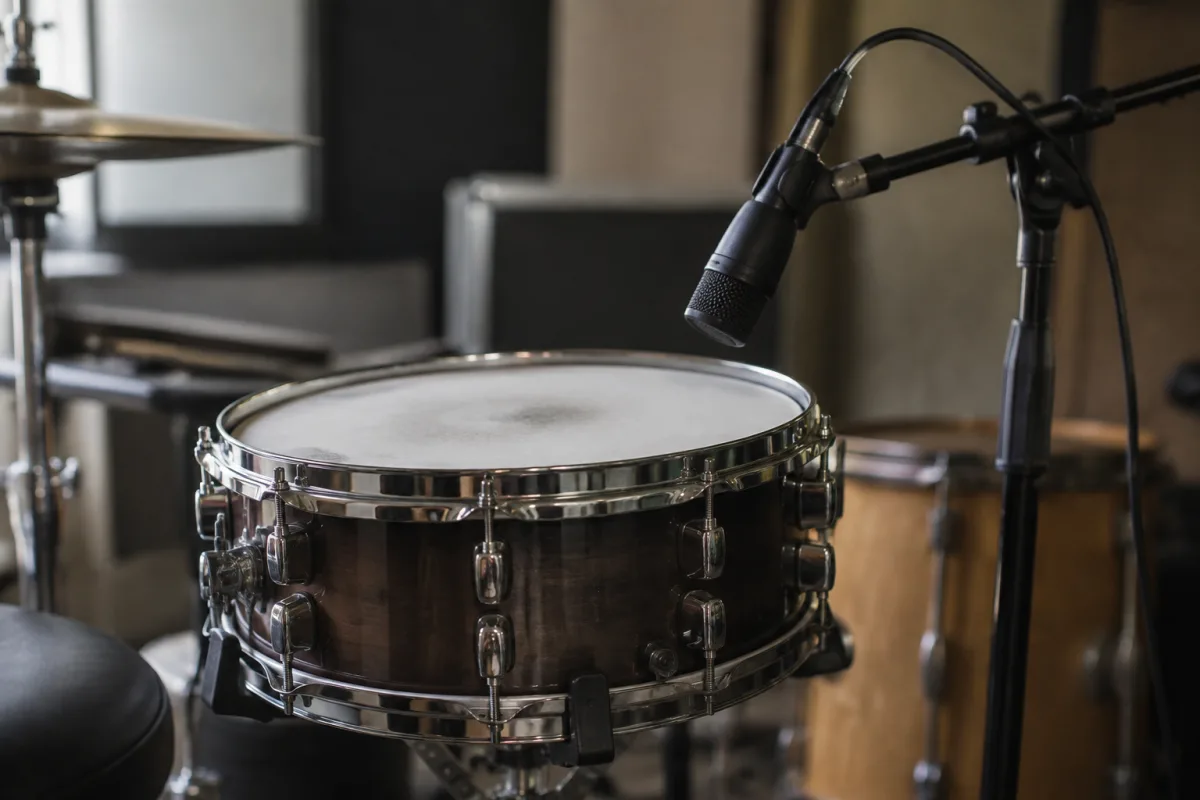
Miking a snare drum can feel intimidating if you're approaching it for the first time. Microphone placement, polar patterns, phase issues—these concepts swirl around and threaten to overwhelm. The encouraging truth is remarkably simple: capturing a snare drum's essence requires fewer than half the technical details you might expect. A single quality microphone positioned thoughtfully produces professional results that satisfy most recording and live-sound scenarios. This guide walks you through your first successful snare-miking experience, demystifies terminology, and helps you avoid the common mistakes that derail beginners.
Why Miking a Snare Drum Matters
A snare drum is your drum kit's cutting edge—the element defining groove and providing rhythmic punch. Yet in ensemble contexts (band recordings, live performances), the snare's voice can disappear into the overall mix. A carefully positioned microphone ensures your snare's voice remains prominent and punchy, contributing its intended impact to the final result.
Learning to mic a snare drum effectively develops skills transferring to other instruments. Microphone positioning, understanding proximity effect, considering phase relationships—these principles apply to toms, kick drums, guitars, and everything else. Mastering snare-miking builds your foundation for all future recording and live-sound work.
Essential Equipment for Snare Miking
You don't need expensive, exotic gear. Start with fundamentals:
- A dynamic microphone: Shure SM57 (£80-100) is the industry standard. Countless professionals use SM57s exclusively. Dynamic microphones handle high sound pressure levels (snare drums produce significant volume) without distortion.
- A microphone stand: A small boom arm or gooseneck stand (£20-40) positions the microphone precisely.
- XLR cables: Quality XLR cables (£10-20 each) connect the microphone to your mixer or audio interface with no signal loss.
- A mixer or audio interface: Even basic models (£50-150) provide microphone input and level control. You don't need expensive equipment initially.
Total startup cost: under £250. This is genuinely affordable gear delivering professional results.
Your First Setup: The Standard Top Approach
For your initial snare-miking experience, position your microphone above the drum, angled toward the snare's playing surface at approximately 45 degrees. This "top" position captures the full snare sound including both the snap (from the snares beneath) and the resonant head.
Height consideration: Position the microphone about 4-6 inches above the drum head. Not directly touching (preventing accidental collision during play), but close enough capturing clear signal.
Angle philosophy: A 45-degree angle from above works beautifully. This positioning avoids pointing the microphone's face directly at the drummer's hands (preventing hand noise) whilst capturing optimal snare character.
Off-centre positioning: Position the microphone slightly off-centre (toward the head's edge rather than directly over centre). This captures excellent snare response whilst reducing hi-hat bleed—a common beginner problem.
Test this basic setup first. If it works, you've succeeded immediately. If adjustments are needed, you have a solid foundation to build upon.
Understanding Microphone Polar Patterns
Microphones are directional—they hear sounds from certain directions more clearly than others. A cardioid microphone (the most common) listens primarily to sounds in front but also hears side and rear sounds at reduced level.
For snare miking, cardioid patterns are ideal. They prioritise the snare whilst naturally rejecting hi-hat sound from the side. This rejection happens naturally; you don't need to do anything special. Understanding this helps you appreciate why certain microphone selections work better than others.
Avoid omnidirectional microphones for snare work. They hear equally from all directions, capturing excessive hi-hat noise alongside snare sound. This fundamental mismatch makes omnidirectional patterns unsuitable for your task.
Managing Hi-Hat Bleed
The most common beginner challenge is excessive hi-hat sound contaminating your snare recording. When the drummer hits the hi-hat cymbal, it's so loud it bleeds significantly into your snare microphone, muddying the recorded sound.
Several strategies mitigate hi-hat bleed:
Position the microphone off-centre: Move your microphone toward the drum's edge away from the hi-hat. This reduces hi-hat pickup through the cardioid rejection principle.
Angle toward the snare head: A 45-degree downward angle toward the playing surface reduces hi-hat contribution relative to snare sound. Experiment with angle steepness—steeper angles reject more side sounds.
Distance management: Don't position excessively close to the snare (less than 2 inches). At extreme proximity, phase issues emerge and sensitivity to drummer movement increases. The 4-6 inch range balances closeness for clarity with distance for tonal balance.
Accept some bleed: Professional recordings always feature some hi-hat in snare recordings. This is normal, not a failure. You're managing bleed levels, not eliminating it completely.
Common Beginner Mistakes
Positioning too close: Microphones at 1-2 inches create phase problems and extreme sensitivity to drum head movement. Move back to 4-6 inches for cleaner sound.
Aiming straight down: A microphone pointed directly downward (90-degree angle) captures excessive hi-hat. The 45-degree angle remains superior.
Using cheap cables: Poor-quality XLR cables introduce noise and signal loss. Spend money here; £15 quality cables last decades and outperform £3 bargain cables dramatically.
Neglecting phase considerations: If you're using multiple snare microphones (top and bottom), phase misalignment creates cancellation—the snare sound thins dramatically. Use a phase-correction button or swap cable polarity at one microphone to align phases. Top-only miking sidesteps this complexity entirely.
Ignoring gain staging: Set your mixer or interface input level so the loudest snare hits register around -3dB to -6dB on the meter (not clipping, but comfortably loud). Proper gain staging prevents both noise (too quiet) and distortion (too loud).
Positioning during rehearsal only: Drummers move—what works during setup might change when playing full force. Position your microphone, then roll tape and observe during actual playing. Adjust based on what you hear.
Exploring Top-and-Bottom Miking Later
After mastering single-microphone top positioning, top-and-bottom miking becomes relevant. A second microphone beneath the drum captures snare character from below. Combining top and bottom recordings produces richness and flexibility impossible with top-only miking.
For now, master top-only positioning. Advanced techniques wait until you're comfortable with fundamentals.
Testing Your Setup
Once positioned, have your drummer play through a full song. Record audio and listen carefully. Ask yourself:
- Is snare punch clear and prominent?
- Do you hear excessive hi-hat noise?
- Is the snare's tone bright enough, or is it dull?
- Do you hear unwanted rustling or mechanical noise?
These questions guide adjustments. Too much hi-hat? Move the microphone further from the cymbal. Dull tone? Angle the microphone more directly at the playing surface. Trust your ears; they're your best guide.
When to Call a Professional
Your initial snare-miking success is absolutely achievable. However, if you're recording an important session and lack confidence, calling an experienced recording engineer (typically £30-50/hour for consultation) prevents costly mistakes. Sometimes, professional guidance on your first session eliminates frustration and establishes correct habits permanently.
For comprehensive information on snare-miking variations, advanced multi-microphone techniques, and detailed equipment options, explore the complete guide to miking a snare drum, which covers sophisticated approaches in greater depth.
Your snare-miking journey begins with straightforward setup and patient listening. Trust your initial instincts; the basic top-positioned microphone approach works beautifully for genuine learning and professional results. With careful attention to positioning and gain staging, you'll capture snare recordings that satisfy your artistic vision. Welcome to the world of snare-miking success.


Comments