


Drum Mutes article
Drum Mutes for Beginners: A Complete Guide
Drum mutes let you practice without disturbing others. Learn which mutes suit your setup, how to use them effectively, and how to balance muted and real-drum practice.
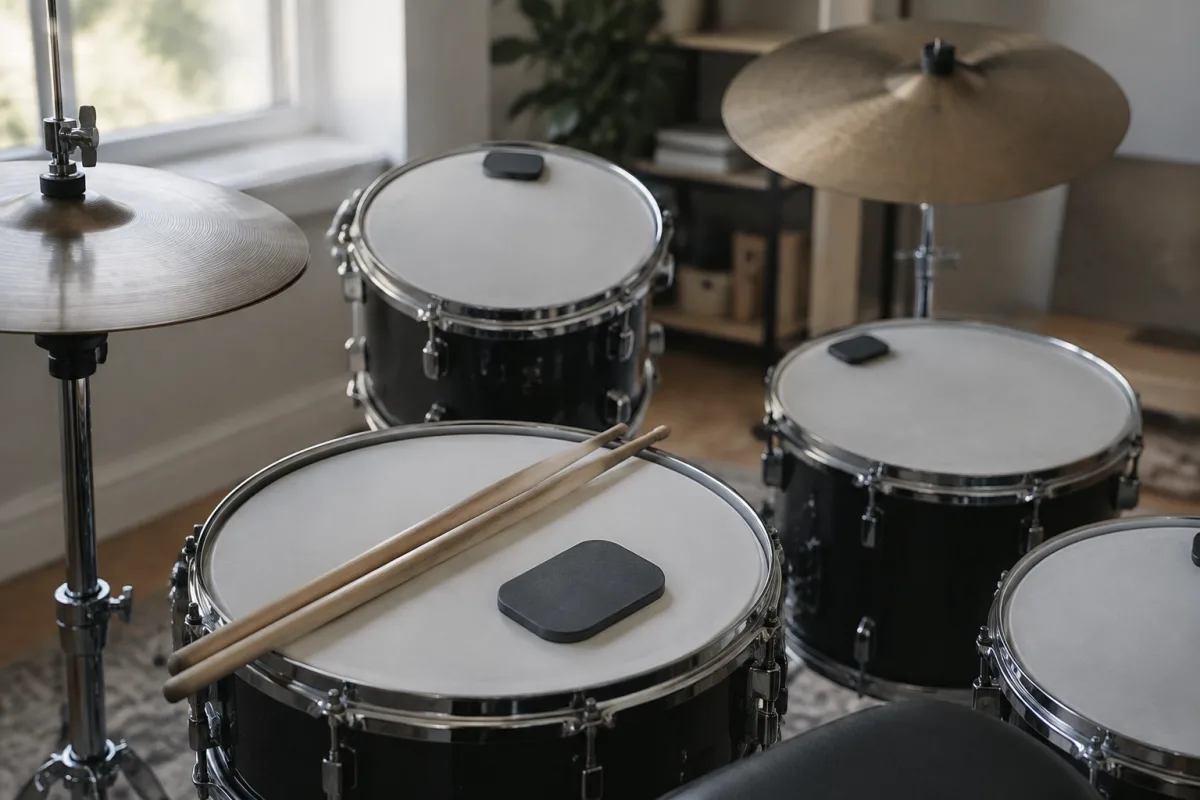
Drum mutes are soft pads placed on your drums to reduce volume and change tone—essential if you're learning drums in a flat, or if you need to practise quietly without disturbing others. For a beginner, drum mutes make the difference between regular practise and zero practise, and they teach you playing technique more honestly than an unmuted kit at lower volume.
What Are Drum Mutes?
Drum mutes are rubber, foam, or mesh pads that rest on the playing surface of your drums. When you strike the drum, the mute absorbs much of the vibration and volume, producing a quieter, duller sound. The stick still hits drum head and resonates with mutes, teaching proper technique—it's just much quieter.
Types of Drum Mutes
Gel pads (foam)
Gel pads are soft foam circles, usually 6–8 inches diameter, that rest loosely on the drum head. They reduce volume by 5–8 dB (noticeable but not dramatic) and slightly deaden the tone. Brands like Evans and Remo make reliable gel pads (£5–12 per pair for drums, £3–5 for cymbals). Gel pads are affordable, removable, and don't damage drum heads.
Mesh heads
Mesh heads replace your regular drum head entirely with a mesh surface (like a marching snare). They reduce volume significantly (10–15 dB) and change the tone dramatically—more like a practice pad than a real drum. Mesh heads cost £20–40 per head and are excellent for serious silent practise, but the playing feel is quite different from a real drum.
Hybrid pads
Hybrid pads sit on the drum head (like gel pads) but offer more volume reduction and durability than foam. They typically cost £8–15 per pair and balance volume reduction with maintaining some of the authentic drum feel.
Cymbal mutes
Cymbal pads are small foam or rubber discs (2–3 inches) that clip onto cymbal stands. They significantly reduce cymbal volume and change the sound from a bright ring to a dull thud. Cymbal mutes cost £3–8 each and are essential if you're playing drums quietly in shared spaces.
First Steps: Choosing Your Mute Setup
Step 1: Assess your volume constraints
In a flat or shared house: gel pads on drums plus mutes on cymbals give reasonable volume reduction. In a bedroom with thin walls: consider mesh heads for maximum quiet. In a noisy area or during the day: gel pads alone might suffice.
Step 2: Buy mutes for your kit
For a typical 5-piece drum kit (kick, snare, 3 toms) plus cymbals, budget £30–60 for gel pads and cymbal mutes. It's affordable insurance against noise complaints.
Step 3: Install and play
Gel pads simply rest on the drum head—no installation required. Just place them gently and start playing. Mesh heads require removing your drum head and installing the mesh (like changing a drum head, which takes 5–10 minutes).
Step 4: Adjust your technique
Playing with mutes feels different—the stick response is different, the bounce is different, the sound feedback is muted. Don't expect it to feel like a real drum. Instead, use muted practise to focus on technique: hand position, timing, dynamics. The authentic feedback will come when you're ready to practise without mutes.
Common Beginner Mistakes
Mistake 1: Expecting muted drums to sound like real drums. They won't. Mutes fundamentally change the playing experience. Accept this and use muted practise to build muscle memory and timing; save "how it really sounds" for unmuted sessions when volume isn't an issue.
Mistake 2: Buying cheap mutes and expecting them to last. Budget foam pads deteriorate quickly, often within a few months. Spend a few extra pounds on decent gel pads (Evans, Remo) and they'll last years. The durability difference is worth the small extra cost.
Mistake 3: Using mutes as an excuse to hit harder. Some beginners hit muted drums with more force than unmuted drums. This is backwards—muted practise should feel lighter and more controlled. Focus on clean, gentle strokes that produce good tone even with mutes on.
Mistake 4: Never practising without mutes. Mutes are tools for quiet practise when you must be quiet. But your real learning happens on unmuted drums where you hear genuine tone and feedback. Use mutes as a practise enabling tool, not as a replacement for real drums.
Mistake 5: Forgetting to remove mutes when you want to hear yourself properly. Beginners sometimes forget they have mutes on and wonder why their drum sounds dead during a performance or recording session. Always remove mutes when you're ready to hear (and let others hear) your actual sound.
Playing With Mutes: Making It Productive
Muted practise is excellent for:
- Building timing and coordination: Without amplified sound feedback, you focus on hand and foot timing rather than listening to tone.
- Developing touch: Light, controlled strokes teach you finesse. Mutes don't reward sloppy playing; they reward precision.
- Late-night practise: No noise complaints if you're committed to your schedule.
- Quiet rehearsals: Band rehearsals at low volume with mutes stay neighbourly while maintaining full practise intensity.
Balancing Muted and Unmuted Practise
Ideal practise routine: 3 days a week with mutes (late at night or whenever volume is an issue), 2 days a week without mutes (when you can hear your real tone). This balance teaches both timing and genuine drum sound. Without unmuted practise, you'll never develop proper dynamics; without muted practise, noise constraints might stop you practising entirely.
The Real Value of Drum Mutes
Drum mutes aren't cheating; they're tools that enable consistent practise. The drummer who practises quietly on mutes every night will progress far faster than the drummer who practises unmuted only twice a week because of noise constraints. Consistency trumps volume.
For a complete exploration of drum mute types, brands, and advanced practise techniques, see our full guide.


Comments