


Bass Drum Mics article
Bass Drum Mics for Beginners: A Complete Guide
Miking bass drums doesn't have to be intimidating. This beginner's guide covers microphone placement, positioning techniques, common mistakes, and how to achieve professional results.
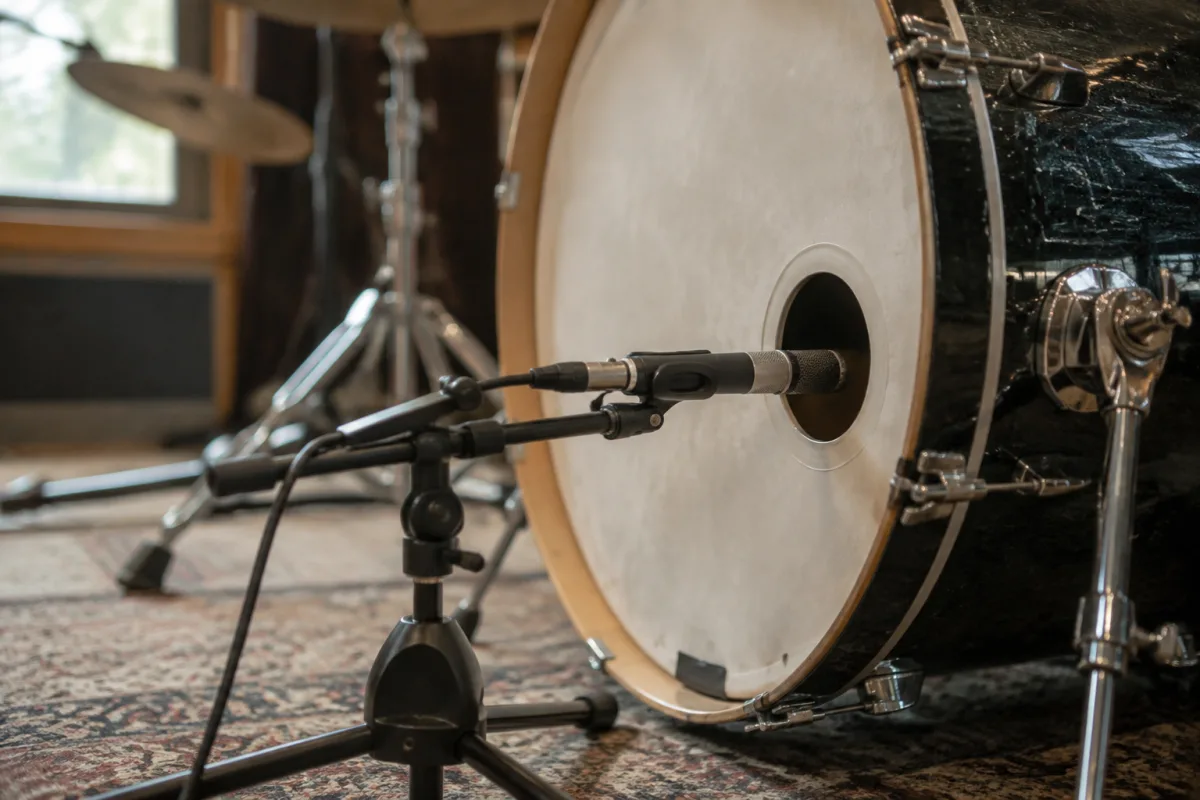
If you've never miked a bass drum (kick drum) before, the prospect might feel intimidating—you're staring at a large percussion instrument and wondering exactly where to position a microphone to capture its fundamental power without overwhelming everything else in the mix. The good news is that miking bass drums isn't complicated, and understanding the basics is entirely within reach for nervous beginners approaching live sound or recording for the first time. This guide walks you through everything you need to know about bass drum microphones, where to place them, what to listen for, and how to get great results confidently.
Why Miking Bass Drums Matters
The bass drum generates powerful low-frequency content that room microphones often fail to capture clearly—the fundamental punch and attack get buried in ambient room noise. Close-miking the bass drum—positioning a microphone directly on the drum—isolates those frequencies, delivering clean, controlled bass drum signals to your mixing console. This control is essential for achieving professional-sounding recordings or live mixes where bass drum impact matters.
Live sound engineers prioritise bass drum clarity because audiences feel bass drum rhythm through their bodies; unclear, muddy bass drum signals spoil the entire mix experience. Similarly, recording engineers know that clear bass drum isolation enables mixing flexibility later—you can adjust level, tone, and emphasis without fighting room ambience or bleed from other instruments.
Understanding Microphone Types for Bass Drums
Dynamic microphones dominate bass drum applications. These rugged instruments handle high sound pressure levels (the intense air pressure shock waves from bass drum impacts) without distorting. Common choices include the Shure Beta 52A, Audix D6, and AKG D112—all designed specifically for bass drum miking.
Condenser microphones occasionally mic bass drums, offering brighter high-frequency response that emphasises attack and detail. However, they're more delicate and handle extreme pressure levels less reliably. Reserve condenser microphones for bass drum applications only when you specifically want that bright character.
Ribbon microphones rarely mic bass drums—they're delicate and can be damaged by extreme pressure levels. Beginners should stick with dynamic microphones—they're forgiving, durable, and sound excellent for bass drum work.
Positioning Your Microphone: The Inside Placement
The most common bass drum miking technique positions the microphone inside the drum, roughly at the centre of the beater head (the head struck by the pedal). This inside placement captures maximum beater attack and low-frequency fundamentals whilst minimising bleed from cymbals and toms positioned around the kit.
Many bass drums have a front head hole (sometimes kick ports) designed for microphone placement. If your drum has this port, position the microphone pointing slightly upward toward where the beater strikes. The microphone sits just inside the hole, angled to maximise coupling with the drum's resonant frequencies.
Distance matters subtly—moving the microphone slightly closer increases attack and beater definition; moving it slightly further away emphasises low-frequency rumble and fullness. Start with the microphone roughly four to six inches from the beater impact point, then adjust based on the sound you're capturing.
Alternative Placements: Outside Miking
Sometimes logistical constraints prevent inside miking—perhaps the bass drum lacks a front port, or the setup doesn't accommodate cable routing. Outside miking (positioning the microphone in front of the bass drum, pointed at the beater head) offers a viable alternative, though it captures more cymbal and tom bleed.
Place the outside microphone approximately 12–18 inches in front of the bass drum, pointed directly at where the beater strikes. Angle slightly downward capturing both the attack and the drum's resonant frequencies. You'll hear more ambient room content with this placement, requiring more mixing work later, but it still delivers usable bass drum signals.
Dual-microphone approaches sometimes combine inside and outside placements, offering maximum control during mixing. This advanced technique belongs in later learning; beginners get excellent results with single microphones positioned thoughtfully.
Common Beginner Mistakes to Avoid
Many nervous sound engineers position microphones too far away, thinking they're capturing more of the complete drum. This distant miking introduces room ambience and noise, muddying the signal. Commit to close-miking—position the microphone on or inside the drum itself. This proximity delivers clean, punchy bass drum signals.
Another frequent error involves neglecting microphone protection. Bass drums generate significant air pressure—cable positioning matters. Route cables carefully avoiding direct shock waves. Failing to secure cables properly results in rustling noise obscuring your bass drum signal. Secure everything firmly before commencing sound checks.
Beginners sometimes underestimate how much bass drum signals dominate mixing. Excessive bass drum level overwhelming everything else is common—when mixing live, start with bass drum level lower than you think appropriate, then gradually increase until the rhythm section locks together. You'll discover optimal levels faster this way.
Impedance Matching and Cable Considerations
Bass drum microphones are typically dynamic types with relatively low output impedance. Standard XLR cables (£5–£25 depending on quality) handle these signals excellently. Don't overthink cable selection—quality audio cables perform consistently across applications.
Long cable runs (over 50 feet from microphone to mixing console) sometimes introduce subtle signal degradation. If your venue requires extremely long runs, consider in-line preamplifiers boosting the signal, but this is rarely necessary for bass drums since they produce strong, easily captured signals.
Understanding Levels and Clipping
Bass drum microphones produce loud signals. Inexperienced engineers frequently don't account for this—they dial console input gains expecting moderate levels, then discover the bass drum clips (distorts) every time the drummer hits hard. This clipping ruins recordings and live mixes.
Begin with microphone input trim set conservatively low. Gradually increase gain during sound checks whilst monitoring for clipping. You want the bass drum signal peaking near (but not exceeding) the console's maximum input level without distortion. This discipline prevents clipping surprises during actual performances.
Microphone Technique During Performances
During live performances, monitor your bass drum levels continuously. Drumming dynamics shift—sometimes drummers play harder, sometimes softer. Your console's input fader allows on-the-fly level adjustment without physically repositioning the microphone. Make subtle fader movements maintaining consistent levels throughout performances.
If clipping occurs despite careful level setting, reduce input trim slightly. It's better to work with conservative levels and room to increase them than to fight clipping constantly. Conservative gain structure prevents technical problems during critical moments.
Recording Session Considerations
Recording bass drums introduces additional complexity—microphone placement decisions in studios differ from live sound requirements. Studios often employ multiple microphones capturing different sonic characteristics, with careful mix-blending later. For beginners, single microphones inside the bass drum deliver excellent recording results.
Invest time in microphone positioning during recording sessions. Unlike live performances where you adjust on-the-fly, recording benefits from extensive experimentation before pressing record. Try slightly different microphone positions, distances, and angles, listening carefully to the resulting sounds. The 15 minutes invested exploring positions often yields dramatically superior recordings.
Monitoring and Mixing Integration
Bass drum signals colour the entire mix's foundation. Muddy bass drum signals muddy every other instrument; clear, punchy bass drum signals make everything sound professional. Pay disproportionate attention to bass drum sound—it's not glamorous work like vocal mixing, but it's genuinely essential.
Listen carefully to how bass drum sounds interact with other low-frequency sources—bass guitar, keyboards, synth pads. Occasionally bass drum and bass guitar frequencies conflict, requiring mixing adjustments. Develop ears for these interactions—they come with experience, but awareness accelerates the learning.
Building Confidence Through Practice
The best way to overcome microphone anxiety is practice. Set up recording sessions with drummer friends specifically to experiment with bass drum miking. Try different microphones if possible, compare results, and discuss what sounds work. This practical experience builds intuition faster than theoretical knowledge.
Document your experiments—write notes about microphone placements, distances, and resulting sounds. Over time, you'll develop personal preferences and reliable techniques that work for your specific equipment and space. This documented learning accelerates confidence development significantly.
Your Path to Bass Drum Mastery
Bass drum microphone work demands attention to detail and thoughtful placement, but it's entirely learnable through deliberate practice. The fundamentals—dynamic microphones positioned close to the drum, careful level management, and conscious listening—carry you through beginners into intermediate sound engineering work. Visit our complete guide to bass drum microphones for detailed specifications and advanced techniques.
Don't let uncertainty prevent you from engaging with bass drum sound. Nervous sound engineers become confident engineers through practice, experimentation, and willingness to learn from mistakes. Your microphone placement choices directly influence how audiences and listeners experience music—that responsibility is genuine, and you're entirely capable of handling it. Start with inside miking using quality dynamic microphones, commit to close positioning, and adjust from there. You'll discover that bass drum miking becomes intuitive quickly, transforming nervous uncertainty into confident competence.


Comments